We've seen already how to extend a volume in AWS, however it's possible that we need to add volumes to an EC2 instance. Be it to use the adequate volume type for our workload or to surpass the limitations of the startup volume.
Let's have a look at how to add volumes to an EC2 instance.
Volume types in AWS
In general AWS offers the following volume types:
- General Purpose SSD (gp2), used by default in most instances. With a capacity ranging between 1GB and 16TB they are adequate for most workloads with an economical pricepoint. Its maximum transfer rate is of 160 MB/s (up to 10,000 IOPS). Approximate cost: $0.10 per GB/month
- Provisioned IOPS SSD (io1), designed for enviroments with large amounts of E/S operations, such as databases. Its capacity varies between 4GB and 16TB, with a maximum transfer rate of 500 MB/s (up to 32,000 IOPS). Approximate cost: $0,125 per GB/month + $0,065 per IOPS/month
- Throughput Optimized HDD (st1), which are ideal for mass processing of sequential data, such as Big Data applications or streaming. Its capacity ranges from 500GB to 16TB, and cannot be used as startup drives. Maximum transfer rate of 500 MB/s (up to 500 IOPS). Approximate cost: $0.045 per GB/month
- Cold HDD (sc1), similar to st1, but these are optimized for less frequently accessed data. Maximum transfer rate of 250 MB/s /up to 250 IOPS). Approximate cost: $0,10 per GB/month + $0,025 per GB/month.
Choosing the right volume, in addition of improving the performance of our instance, yields a significant cut in monthly costs.
Steps to add a volume to an EC2 instance
1. Create the volume
We must first create the volume within the instance in which we wish to associate it with. Thus the first step is to determine the zone.

Next up we head to Elastic Block Store => Volumes and click in Create Volume. A window will pop up in which we'll define the parameters of the new volume.
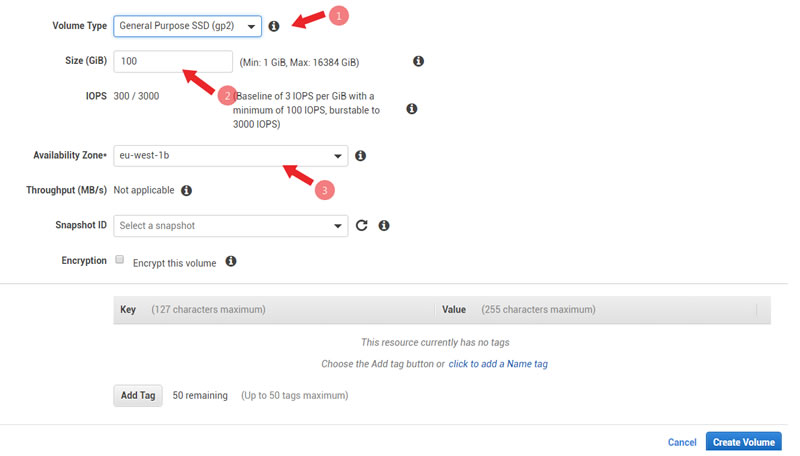
Select the volume type, its size and the zone in which to create it. In the case of a gp2 volume, we'll indicate the number of IOPS required. We have the option to choose an image (snapshot) or to leave it blank to create an empty disk.
Click on Create Volume and wait for it to become available.
2. Link the volume to the instance
Select the recently created volume, click in Action and select Attach Volume. A list will drop down with the instances in the same space and we'll select one of them.
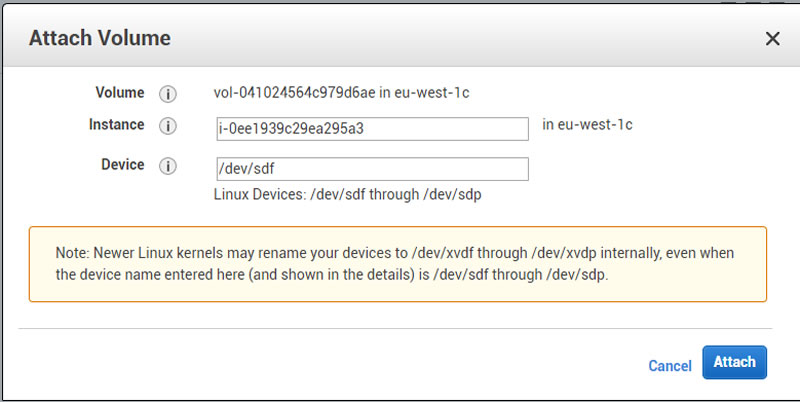
Now we simply click Attach and wait for the volume to be ready.
3. Connect to the instance and mount the volume
Connect to the instance and activate the new disk with the tools provided by the Operative System. In our case, for a Linux instance, connect via ssh and check the result.

The lsblk command shows the disks linked to that instance, out of which the second one is not partitioned. We can run an additional check with the sudo file -s /dev/xvdf. If the volume was not partitioned (for example, it was created from an instant volume) the result would differ from what is shown in the picture.
Notice that the device is created as /dev/xvdf, although the console shows it as sdf.
Since the device is empty we'll format it with, for example, ext4: sudo mkfs -t ext4 /dev/xvdf.

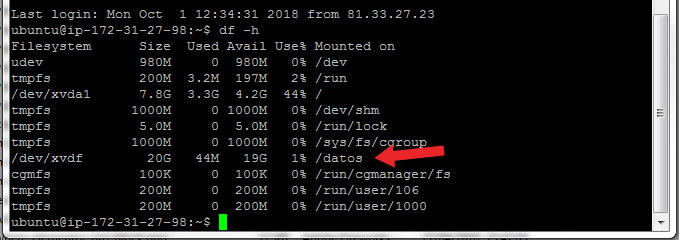
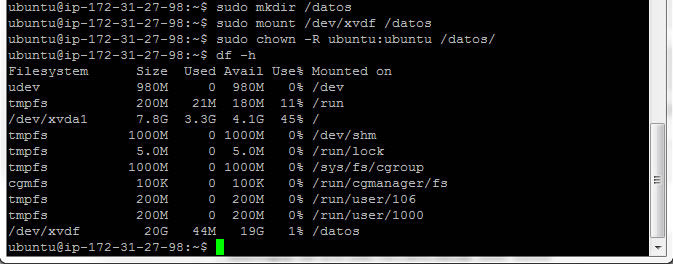
Once the volume has been formatted (or if the volume is not blank), we proceed to mount it, establishing the adequate permissions and verifying that everything is OK:
sudo mkdir /datos
sudo mount /dev/xvdf /datos
sudo chown -R ubuntu:ubuntu /datos/
df -h
3. Modify fstab to automatically mount the volume upon restart
If we want our volume to be automatically mounted with every system restart we need to add a line to the file /etc/fstab. To identify the volume we use the UUID generated upon formatting, or instead we can identify it through sudo blkid.
In our example, the line to add would be:
UUID=c8a79736-4aa6-4000-bfbd-64698a83efea /datos ext4 defaults,nofail 0 2

With the sudo mount -a command, we verify that there are no errors in fstab. We need to fix any issue before restarting the system or we risk the system not booting.
As always, a good measure is to make a fstab backup in order to restore it if we are unable to fix any errors.
Should everything go well we'll have our volume available upon system restart.
